





Table Of Contents

A DFM review process is a structured evaluation of a part or assembly design against the real constraints of the machine, tool, or process that will produce it, run early enough to change course cheaply. The core habit that separates teams who profit from it from teams who don’t: run the review in stages, tie every flagged issue to a dollar and schedule impact, and close every action item before drawings freeze. Done right, it lowers late engineering changes, cuts first-article rejects, and improves first-pass yield.
TL;DR:
- Running a DFM review in parallel with supplier assessments can significantly shorten the review cycle and improve manufacturability insights.
- Prioritizing issues with a should-cost model ensures resources focus on design changes that truly reduce production costs at high volumes.
- Documenting all findings in PLM and linking them to part revisions prevents recurring mistakes and streamlines future reviews.
- Conducting reviews at concept, pre-freeze, and post-prototype stages captures evolving design risks before costly tooling decisions.
- Tailoring checklists to specific processes helps identify relevant flags, such as bend conflicts in sheet metal or warp risks in molding, without unnecessary redesigns.
What Are The Steps In A DFM Review Process?
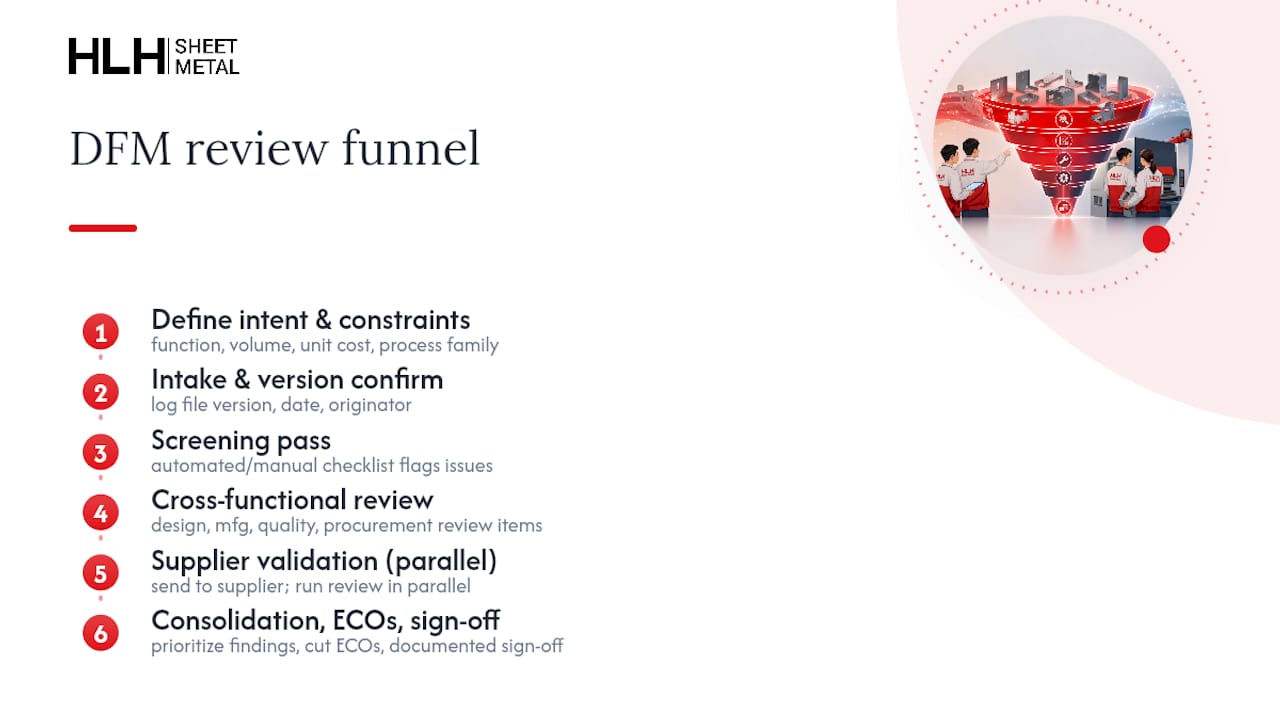
A DFM review process works best as a funnel, not a single meeting. You start broad and get more expensive to change as you go, which is exactly why the workflow front-loads cheap fixes and pushes expensive validation to the point where the design has actually earned it.
1. Define intent and constraints. Before anyone opens a CAD file, nail down the part’s function, expected volume, target unit cost, and the process family it’s likely to run on (sheet metal, machining, molding, or a hybrid). A bracket destined for 50 units behaves differently in review than the same bracket destined for 50,000. Skipping this step is the single most common reason reviews wander into debates that don’t matter for the actual production run.
2. Intake and version confirmation. Confirm you’re reviewing the current, correct revision. This sounds obvious until you’ve spent two hours flagging issues on a drawing that was already superseded. Log the file version, date, and originator before anything else happens.
3. Screening pass. A first-pass automated or manual check against a standard DFM checklist catches the loud, obvious problems: features below minimum wall thickness, holes too close to bends, undercuts with no draft. Some teams now run this screening pass with AI-assisted DFM tools that flag geometry violations before a human reviewer ever opens the file, which speeds up the funnel without replacing engineering judgment downstream.
4. Detailed cross-functional review. This is where design engineering, manufacturing engineering, quality, and sometimes procurement sit down together and walk the flagged items plus anything the checklist missed. Different disciplines catch different things. A designer sees function; a manufacturing engineer sees the fourth setup nobody budgeted for.
5. Supplier validation and parallel review. Send the same package to your fabrication or contract manufacturing partner and run their review in parallel with your internal one rather than sequentially. Suppliers see tooling and process limits your internal team doesn’t have visibility into, and running the reviews side by side instead of back to back can cut a full review cycle out of your schedule.
6. Consolidation, ECOs, and sign-off. Merge internal and supplier findings into one prioritized issue list, cut engineering change orders for anything that requires a design update, and get a documented sign-off before release. This is the step teams most often shortcut, and it’s the one that causes the most rework later.
The FastPreci DFM guide for CNC machining documents a comparable multistep vendor workflow running from drawing receipt through feasibility assessment to a formal DFM report and drawing freeze, with the same basic logic: screen fast, review deep, validate with the people who’ll actually cut metal, then lock it down. The reason this sequence matters isn’t procedure for its own sake. The cost of a design change grows non-linearly as a project moves toward production, and a workflow that front-loads cheap catches is the only real defense against five- or six-figure late fixes.
What Files And Data Do You Need Before A Review?
A DFM review is only as good as the package you hand the reviewer. Half the wasted review cycles happen because someone shows up with a PDF and a hopeful attitude instead of the actual data set.
Bring these to every review:
- 3D model in STEP or IGES, plus native CAD if your reviewer or supplier can open it, so geometry can be checked directly rather than inferred from a 2D view.
- 2D drawings with full tolerances, including GD&T callouts on critical features, not just overall dimensions.
- A complete bill of materials with approved alternates for any sourced components, so a substitution doesn’t derail the review later.
- Stack-up analysis for any assembly with more than two mating parts, especially where tolerances compound.
- Test plans and critical datum callouts so the reviewer knows which surfaces and dimensions actually matter functionally, versus which are just habit.
- Material and finish specifications, including any secondary process like anodizing, powder coating, or passivation.
Annotate and version every file consistently, ideally with a revision table baked into the drawing itself rather than tracked in a separate email thread. Share your process window assumptions and any supplier-specific tooling constraints up front. A structured intake that confirms drawing version, technical classification, and process feasibility before the detailed review starts is common practice among fabrication partners, and it exists for a reason: it stops the review from restarting halfway through because someone finally checked the revision letter.
Pro Tip: Export your STEP file with the same units and origin your supplier’s CAM software expects. A part that imports at the wrong scale or with an offset origin wastes the first thirty minutes of every review on troubleshooting the file instead of the design.
If you’re designing in-house before sending files out, a look at CAD settings that reduce sheet metal production costs is worth the twenty minutes before you export anything.
What Should A Process-specific DFM Checklist Cover?
Generic DFM checklists exist, but the useful ones branch by process, because a flag that matters in machining is often irrelevant in molding. Treat every flag below as a candidate for review, not a verdict. The DFMA design review checklist is explicit on this point: a checklist is a screening tool, and flagged items belong in a should-cost analysis before anyone commits to a redesign.
Universal prompts worth running against any part regardless of process: Is the tolerance tighter than the function requires? Does the part need a fixture that doesn’t already exist in the supplier’s shop? Is there a simpler geometry that delivers the same function?
Sheet metal flags center on bend relief clearance, minimum hole-to-bend distance, and K-factor assumptions that don’t match the actual material and thickness. Bend sequence conflicts, where one bend blocks tooling access for the next, show up more often than most designers expect.
Machining flags focus on wall thickness relative to tool deflection, the number of setups required to access all features, and pocket depth-to-width ratios that push past standard tooling limits.
Molding flags cover draft angle on vertical walls, wall thickness balance across the part (uneven walls cause warp), and rib height-to-thickness ratios that risk sink marks.
PCB flags include trace aspect ratio on plated through-holes, solder mask clearance around pads, and via-in-pad designs that need extra process steps to avoid solder wicking.
| Process | Common flag | Why it matters |
|---|---|---|
| Sheet metal | Hole too close to bend line | Risk of hole distortion during forming |
| Machining | Deep, narrow pocket | Tool deflection causes wall taper |
| Molding | Uneven wall thickness | Differential cooling causes warp |
| PCB | Via-in-pad without fill | Solder wicks into via during reflow |
Every flag in that table is a candidate for a fix, a documented waiver, or a should-cost conversation, not an automatic redesign order. The DFMA methodology frames this as continuous practice: screen the process early, expose the cost drivers behind each flag, iterate on the ones that move the needle, and validate the rest with the supplier before locking geometry.
How Do You Prioritize And Rank DFM Issues?
Not every flag deserves the same response, and treating a minor cosmetic note with the same urgency as a tooling-breaking geometry problem burns review time you don’t have. Sort every finding into one of three buckets:
- Critical: blocks manufacturability outright or creates a safety/compliance risk. Requires redesign before quoting proceeds.
- Major: increases cost, cycle time, or reject rate meaningfully but doesn’t block production. Requires a should-cost comparison before deciding.
- Minor: cosmetic or marginal efficiency issue. Usually accepted with a documented rationale rather than redesigned.
Should-cost modeling is what turns that sorting from a gut call into a decision anyone can defend later. Build a rough cost model around the drivers each flag actually touches: cycle time, tooling wear, scrap rate, and secondary operations. A flag that adds forty seconds of cycle time across a 10,000-unit run is a different conversation than the same flag on a 50-unit prototype batch.
Rank fixes by multiplying the per-unit cost delta by expected volume, then layer in schedule risk. A fix that saves $0.40 per unit on a 100,000-unit annual run outranks a fix that saves $2.00 per unit on a run of 200, even though the second number looks bigger on paper.
Documented risk acceptance beats forced redesign when the flagged issue is minor, the cost of the fix exceeds the cost of the risk, and the deviation is written down with the rationale attached so it doesn’t get relitigated on the next revision. Checklist-driven reviews that skip should-cost analysis tend to turn every flag into an unnecessary redesign, which is the opposite of what a prioritization framework is supposed to prevent. The non-linear cost curve of late design changes is exactly why this ranking exercise happens before tooling commitment, not after.
How Do You Document And Close DFM Findings?
Findings that live only in someone’s meeting notes get re-discovered on the next revision, usually by a different engineer, at a worse time. Four deliverables should come out of every DFM review:
- A numbered issue list with risk classification (critical, major, minor) for each item.
- Redline drawings with each issue tied to a specific callout number on the print, not a vague paragraph description.
- A process routing suggestion when the review surfaces a better-fit process or vendor capability.
- A cost and lead-time impact table showing the delta for each proposed fix.
Vendor DFM reports typically bundle these four elements into a single deliverable engineers can act on immediately, tying each issue number directly to a location on the drawing.
Track every open item in an ECO or ticketing system with a named owner and a due date. A structured change control process keeps engineering changes traceable instead of scattered across email threads, which matters most when a part comes back for revision eighteen months later and nobody remembers why a dimension changed.
When supplier comments conflict with internal findings, reconcile them explicitly rather than picking a side by default. Run parallel supplier reviews on high-risk parts so you catch disagreements before they become schedule surprises. Archive resolved findings into your living checklist. A recurring issue across three projects is a signal your standard checklist is missing a prompt, and that’s worth fixing once instead of rediscovering three times.
Sheet Metal DFM: Practitioner Notes From HLH Sheet Metal
Sheet metal carries its own short list of failure points that a generic checklist won’t catch. Flatten the part digitally before committing to a bend sequence, because a design that looks fine in 3D can reveal interfering bends the moment you unfold it. Confirm the K-factor assumption matches your actual material and thickness rather than a default software value. Check hole-to-bend spacing and bend relief clearance on every formed edge, and flag any weld joint where spot-weld access is blocked by an adjacent feature.
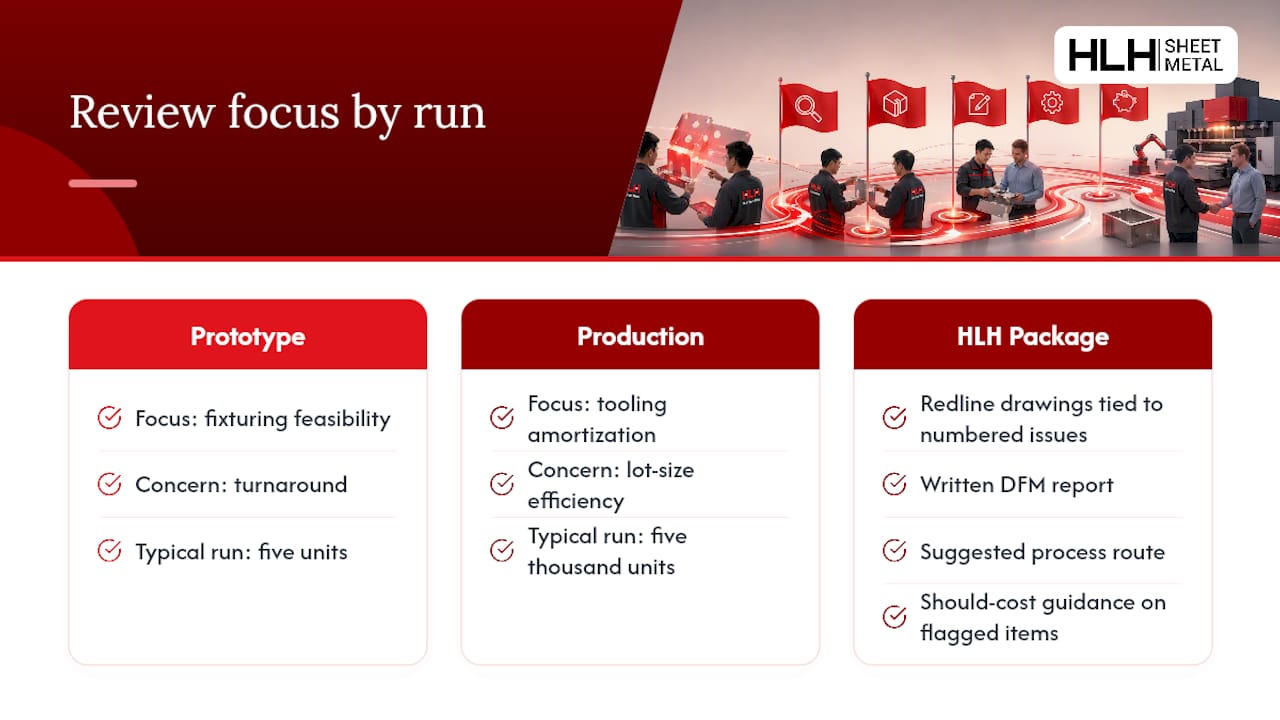
Prototype and production runs call for different review emphasis. A prototype review focuses on fixturing feasibility and turnaround; a production review focuses on tooling amortization and lot-size efficiency, since a fixture that’s fine for five units can be the wrong call for five thousand.
At HLH SHEET METAL, a DFM review package typically includes redline drawings tied to numbered issues, a written DFM report, a suggested process route, and should-cost guidance on flagged items, backed by ISO-certified quality processes across our manufacturing plants and an English-speaking support team for international clients coordinating across time zones. Our sheet metal DFM design guide covers the technical detail behind these checks in more depth.
Pro Tip: If your part needs part marking or traceability etching, confirm the marking method with your fabricator before finalizing the design. Laser engraving depth and placement can interact with coating and finish specs in ways that are easy to miss until the finished part comes back looking wrong.
When Should You Run DFM Reviews In The Development Cycle?
Timing determines how much a DFM review actually saves you. Run reviews at four points:
- Concept screening, before detailed CAD work starts, to catch process mismatches while changes cost nothing.
- Mid-design review, once geometry is mostly locked but before tolerances are finalized, catching structural and process feasibility issues while they’re still cheap to fix.
- Pre-freeze final review, the last checkpoint before drawings release, focused on closing every open issue and getting formal sign-off.
- Post-EVT retrospective, after the first build, to feed real-world findings back into your living checklist.
Make DFM sign-off a formal release gate, not a courtesy step. If a documented risk remains unresolved at freeze, require a written waiver with the rationale attached rather than letting it slide through silently. Supplier validation should align with your quoting and tooling milestones. Running the supplier’s parallel review before tooling commitment gives you a real chance to change course; running it after tooling is cut just gives you a very expensive lesson.
What Pitfalls Derail A DFM Review?
The most common failure isn’t a missed technical flag. It’s process discipline. Teams run the checklist once, early, and never revisit it as the design evolves, so late-stage geometry changes slip through unreviewed. Fix this by tying a DFM re-check to any change that touches a flagged dimension or feature, not just to the calendar.
Another recurring problem: treating every checklist flag as mandatory. Engineers who don’t distinguish critical from cosmetic end up redesigning features that were never actually going to cause a production problem, burning schedule on items a should-cost analysis would have waved through in five minutes.
Supplier communication gaps cause a third category of pitfall. When internal and supplier reviews run sequentially instead of in parallel, findings arrive too late to influence anything, and the supplier’s comments become a second, disconnected issue list instead of an integrated one. Reconcile the two lists explicitly and assign a single owner to close conflicts.
Finally, reviews that happen once and get filed away lose their value entirely. Without an archive step, the same design mistake reappears on the next project because nobody updated the standard checklist. The fix costs almost nothing: after every review, spend fifteen minutes updating the living checklist with anything new the review surfaced, so the next engineer starts one step ahead instead of relearning the same lesson.
How Does DFM Fit Into Your PLM System?
A DFM review that lives outside your product lifecycle management system is a review that gets forgotten. Issue lists, redlines, and ECOs generated during a review need to attach directly to the part record in PLM, not sit in a separate folder that nobody checks during the next revision cycle.
Practically, this means tagging each DFM finding to a specific part number and revision inside PLM, linking the resulting ECO to that same record, and requiring DFM sign-off as a gated status before the part can move to a released state. Most PLM platforms support custom workflow states for exactly this purpose, and using one turns “did we do a DFM review” from a question someone has to chase down into a field anyone can check.
The archival benefit compounds over time. When a similar part comes up on a future project, an engineer searching PLM by part family or material should be able to pull up the prior DFM findings alongside the part history, not start from a blank checklist. This is also where a should-cost model earns its keep twice: once during the original review, and again months later when a near-identical part needs the same cost drivers evaluated without redoing the entire analysis from scratch.
Treat PLM integration as part of the review’s definition of done. A DFM review that ends without its findings attached to the part record in PLM is a review that will need to happen again, on the same part, for the same reasons.
What Kpis Show A DFM Review Process Is Working?
You can’t tell if a DFM review process is paying off without tracking a few concrete numbers over time. The most direct metric is late-stage engineering change rate, the share of ECOs issued after drawing freeze versus before. A falling rate across projects is the clearest sign your review is catching issues earlier than it used to.
First-pass yield on initial production runs is the second metric worth tracking closely. If yield climbs after you tighten your review process, that’s the should-cost prioritization work translating into fewer rejected parts on the shop floor.
Track time from design freeze to first article approval as a schedule metric. A shrinking gap usually means fewer surprises are showing up during first-article inspection, because the DFM review already caught them.
Finally, track issue recurrence rate, meaning how often the same category of flag shows up across multiple projects. A high recurrence rate points to a gap in your living checklist rather than a one-off design mistake, and it’s the single best signal for where to invest checklist-improvement time next quarter.
None of these metrics need a dashboard to start. A shared spreadsheet updated after every review, tracking ECO count, yield, and recurring flag categories, is enough to show whether your process is actually improving or just generating paperwork.
What Structured Reviews Actually Save You
A few years back, a mid-volume enclosure project came through review with a bend sequence nobody had flattened and checked. The 3D model looked fine. Unfolded, two bends interfered with each other in a way that would have shown up only after tooling was cut. Catching it during the mid-design review instead of at first article probably saved several weeks of retooling and a scrapped batch, and it cost nothing more than fifteen minutes with the flat pattern open before sign-off.
That’s the pattern worth internalizing: the value of a DFM review process isn’t the checklist itself, it’s whether someone actually looks at the unfolded geometry, the actual tolerance stack, the real supplier constraint, before committing money to tooling. Checklists don’t catch problems. Engineers who take the checklist seriously catch problems.
Three habits separate teams who get real value from DFM reviews from teams who treat them as a box to check. First, keep the checklist living, not static. Every recurring issue across projects should turn into a new prompt. Second, bring suppliers in early and run their review in parallel with yours, not after. Third, build a shared cost model everyone trusts, so a prioritization argument doesn’t turn into a subjective debate about whose opinion carries more weight.
— Nash
How To Request A DFM Review And Quote From HLH Sheet Metal
Skipping a formal DFM review to save a week upfront usually costs you a month later once tooling is already cut and the geometry problem shows up on the shop floor. HLH SHEET METAL runs DFM review as a standard step before quoting, not an optional add-on, so the issues that matter get caught while changes are still cheap.
Send your STEP file, 2D drawing, and BOM and our engineers return a DFM report with risk-classified redlines, a suggested process route, and should-cost guidance on any flagged item, typically within a short turnaround window rather than a multi-week back-and-forth. From there, the same team carries the part from prototype through production runs across our ISO-certified plants, with English-speaking support handling the handoff so nothing gets lost in translation between design intent and shop floor execution.
If you have a part ready for review, request a quote for sheet metal fabrication and include your files. If your project needs broader fabrication capability details first, our capabilities page covers the processes available for your DFM review to weigh against.
FAQ
What Is A DFM Process?
A DFM process is the ongoing practice of evaluating and adjusting a design against real manufacturing constraints throughout development, using process screening, cost modeling, and supplier feedback rather than a single late check.
What Is A DFM Review?
A DFM review is a specific, scheduled evaluation event, screening or detailed, where a design package is checked against manufacturability criteria and the findings are documented as a risk-classified issue list with redlines.
What Is A DFM Checklist?
A DFM checklist is a structured set of process-specific prompts (sheet metal, machining, molding, PCB) used to flag potential manufacturability issues, meant to feed a should-cost analysis rather than serve as an absolute rulebook.
What Does DFM Stand For?
DFM stands for design for manufacturability, the practice of designing parts so they can be produced efficiently, reliably, and at the lowest reasonable cost for the chosen process.
How Long Does A DFM Review Take?
Turnaround depends on part complexity and the number of review passes required, but many fabrication partners, including HLH SHEET METAL, return an initial DFM report within a short window rather than a multi-week cycle for straightforward sheet metal parts.

