





Table Of Contents
Prototype Cost Estimation
Appearance models typically run $150 to $2,000, functional mechanical prototypes span $1,500 to $60,000 depending on complexity, custom electronics devices land between $10,000 and $120,000, and metal prototypes made with CNC, laser cutting, or SLM cost $500 to $10,000 or more, according to rapid prototyping pricing guidance. The most reliable method for estimating your own project is the three-bucket model: per-unit cost, one-time tooling or NRE, and internal infrastructure, combined with a landed BOM multiplier of 1.2x to 1.5x for low-volume builds, as recommended in hardware startup budgeting guidance. Design readiness, how finished your geometry and tolerances actually are, moves the price more than any other single factor, so lock that down before requesting quotes.
TL;DR:
- Appearance models generally cost $150 to $2,000, while functional prototypes with moving parts or electronics can range from $1,500 to $60,000.
- Costs are heavily influenced by material choice, geometric tolerances, batch quantity, and process complexity, with tooling and NRE becoming dominant at higher volumes.
- A three-bucket budgeting method separates costs into per-unit, one-time tooling, and internal infrastructure, providing a more accurate estimate than lump sums.
- Reducing prototype costs involves design simplification, material substitution, batching, and requesting detailed, itemized quotes from suppliers.
- For sheet-metal prototypes, preparing detailed files, specifying finish and tolerances, and understanding process-specific cost drivers improve estimate accuracy.
Key Takeaways And Practical Cost Ranges
Before you build a spreadsheet, it helps to know what “normal” looks like. Appearance models built for look-and-feel reviews sit at the low end of the spectrum, while functional assemblies with moving parts, electronics, or certified materials climb fast. Custom electronics devices carry the widest range because sensors, connectors, and firmware integration add cost that has nothing to do with the enclosure itself.
Quantity changes the math more than most founders expect. A single unit built by hand carries the full weight of setup time and one-off tooling. Ordering five to fifty units starts to spread that setup cost across more parts, and a small pilot run of a few hundred units can cut per-unit price sharply if the process supports batching, according to the three-bucket budgeting framework.
Treat any number you read online, including the ranges above, as directional. They tell you the order of magnitude so you can sanity-check a quote, not the exact price for your part.
- Appearance models: $150 to $2,000, mostly SLA or FDM with cosmetic finishing.
- Functional mechanical prototypes: $1,500 to $60,000, depending on tolerances, materials, and assembly complexity.
- Custom electronics devices: $10,000 to $120,000, driven by components, firmware, and enclosure integration.
- Metal prototypes: $500 to $10,000 or more for CNC, laser cutting, or metal SLM parts.
Once you have a real CAD file and a target quantity, it is time to get an actual quote rather than lean on these bands.
The Six Main Cost Drivers That Determine A Prototype Price
Every prototype quote is built from the same handful of variables, and understanding them lets you read a supplier’s line items instead of just accepting the total.
Material and process selection sets the floor. FDM plastic parts might run $10 to $80 while metal 3D printing can reach $200 to $5,000 or more for the same size part, according to rapid prototyping cost data. Geometry, tolerances, and setup labor come next: tighter tolerances mean slower machining, more inspection, and often a second setup on the machine. Quantity and batching change the per-unit number because setup and programming costs get divided across more parts. Tooling and NRE can dominate the budget entirely once you move from a handful of units to a production-intent run, since a stamping die or injection mold is a fixed cost regardless of how many parts it eventually makes.
Testing, inspection, and certification pre-scans add cost that is easy to forget when you are focused on the physical part itself. Schedule and rush fees, plus shipping, duties, and other pass-through costs, round out the list and often surprise first-time buyers.
A 2019 CAD-driven cost estimation study tested on three sheet-metal stamped components reported an average absolute deviation under 10% between estimated and actual cost, according to peer-reviewed research on stamped-component costing_2019_936-950.pdf). That level of accuracy is achievable only when the estimator has real CAD data, material specs, tolerances, and batch size, which is exactly the information a good supplier will ask you for.
- Material and process choice sets the baseline price per part.
- Tighter tolerances and complex geometry add machine time and setup labor.
- Order quantity spreads fixed setup costs across more units.
- Tooling and NRE become the dominant line item at higher volumes.
- Testing, inspection, and certification pre-scans add cost late in the process.
- Rush schedules, shipping, and duties are pass-through costs that inflate the final invoice.
A Practical Estimation Method: Three Buckets, Landed BOM Multiplier, And Contingency
The most defensible way to build a prototype budget separates spending into three buckets rather than one lump sum, a structure recommended in prototype costing guidance for hardware startups.
- Bucket 1, per-unit cost: your bill of materials, assembly labor, and per-part processing such as machining time or finishing. This is the number that scales directly with quantity.
- Bucket 2, one-time NRE and tooling: programming time, fixtures, stamping dies, or injection molds. These costs do not change whether you order 10 units or 100.
- Bucket 3, internal infrastructure: lab equipment, in-house printers, or test rigs your team needs regardless of any single project. Early-stage teams often underbudget this bucket entirely.
BOM-only estimates that skip this step can be off by 3x to 10x once NRE, tooling, and logistics are added, according to the same hardware startup budgeting guidance.
Pro Tip: Build three scenarios, optimistic, base, and conservative, instead of a single number when you present a budget to stakeholders or investors.
Process-by-process Cost Shapes: Additive, Subtractive, Casting, And Low-volume Stamping
Different manufacturing processes create fundamentally different cost curves, and picking the cheapest one that still proves your point is a skill worth developing.
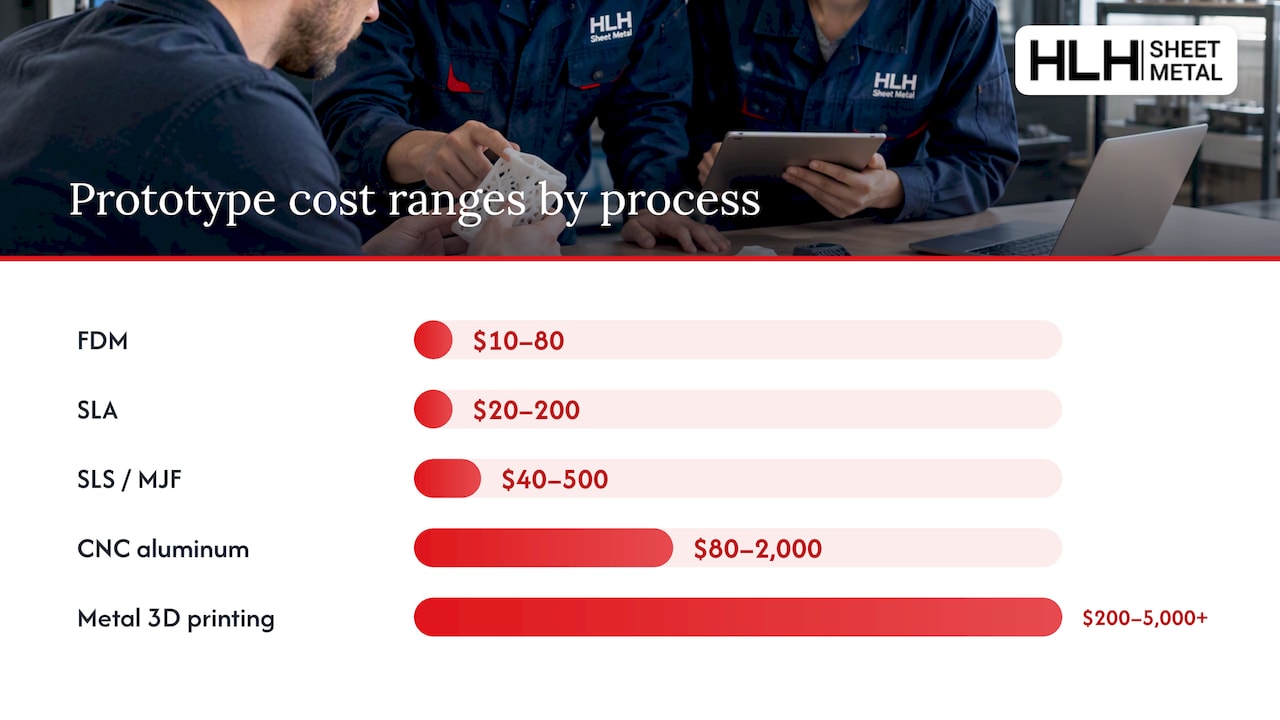
FDM is the cheapest starting point for form checks, SLA gives you smoother surface finish for appearance models, and SLS or MJF suit functional parts that need better mechanical properties, with all three priced primarily by material and part volume, according to rapid prototyping cost benchmarks. CNC machining and metal SLM are dominated by machine time, the number of setups required, and raw material cost, which is why a simple bracket costs far less than a part with features on six sides. Vacuum casting and soft tooling bridge the gap when you need dozens of production-like parts without committing to a hard mold.
Sheet metal follows its own logic. Laser cutting plus bending suits low quantities and fast iteration, while stamping only makes sense once volume justifies the die cost, since nesting efficiency and lot size shift the math significantly, according to sheet-metal cost estimation guidance. Finish costs such as painting, anodizing, or powder coating are usually quoted per part or per square foot and should be budgeted as a separate line rather than folded into the base price.
| Process | Typical cost range | Primary cost driver |
|---|---|---|
| FDM | $10 to $80 | Material volume and print time |
| SLA | $20 to $200 | Material and surface finish requirements |
| SLS/MJF | $40 to $500 | Material and part volume |
| CNC aluminum | $80 to $2,000 | Machine time and setups |
| Metal 3D printing | $200 to $5,000+ | Machine time and material |
Ranges reflect rapid prototyping cost data for individual parts and vary with size, geometry, and finishing.
Worked Examples: Three Realistic Prototype Estimates
Seeing the three-bucket method applied to real numbers makes it easier to build your own spreadsheet. These figures are illustrative examples meant to show the calculation, not market averages.
- SLA appearance model: say a single housing costs $45 in resin and machine time (Bucket 1), needs no tooling since it is printed directly (Bucket 2 is $0), and requires no new lab equipment (Bucket 3 is $0). Add hand finishing and primer at $30, apply a 1.3x landed multiplier to the $75 subtotal for $97.50, then add 20% contingency for a total near $117 per unit.
- Functional mechanical assembly: say CNC parts and purchased hardware total $220 per unit (Bucket 1), a custom fixture for assembly runs $1,800 one time (Bucket 2), and no new infrastructure is needed (Bucket 3 is $0). Testing and inspection add $40 per unit. Apply a 1.4x multiplier to the $260 per-unit subtotal for $364, plus 15% contingency, landing near $419 per unit before the fixture cost is amortized across the build.
- Sheet-metal enclosure: say flat-pattern material and nesting yield produce a blank cost of $18, laser cutting and bending setup and runtime add $35, welding and hardware insertion add $22, and finishing plus inspection and packaging add $15, for a Bucket 1 subtotal of $90. A bending fixture (Bucket 2) costs $600 one time. Apply a 1.3x landed multiplier to $90 for $117, add shipping and duties, then apply 20% contingency for a total near $148 per unit on a small first batch.
| Example | Bucket 1 (per-unit) | Bucket 2 (NRE/tooling) | Estimated total per unit |
|---|---|---|---|
| SLA appearance model | $75 | $0 | ~$117 |
| Mechanical assembly | $260 | $1,800 | ~$419 |
| Sheet-metal enclosure | $90 | $600 | ~$148 |
How To Reduce Prototype Cost Without Losing Learning Value
Cutting cost does not have to mean cutting the value of what you learn from a build. The biggest lever is often design simplification: fewer unique parts, standard fasteners instead of custom hardware, and fewer setups on a CNC machine all reduce cost without touching function.
Material substitution is another lever worth using deliberately. A part meant only to check fit and appearance rarely needs the same material as the functional version, so swapping to a cheaper plastic or aluminum grade for early rounds is a reasonable trade-off. For additive processes, batching multiple parts into one build and using filler parts to fill unused build volume spreads the machine cost across more output.
Quotation practices matter as much as design choices. Send a complete spec sheet, reference parts when you have them, and ask suppliers for a run sheet that itemizes setup, machine time, and material separately, which mirrors the DFM guidance in sheet-metal design optimization resources. Delay committing to tooling until your design has stabilized through at least one round of testing, since a die or mold built around a design that later changes is money spent twice.
- Reduce unique part count and use standard hardware wherever function allows it.
- Substitute cheaper materials for appearance-only builds.
- Batch additive parts and fill unused build volume to cut per-part cost.
- Send complete specs and ask for itemized run sheets to compare quotes fairly.
Pro Tip: Ask two suppliers to quote the identical file and spec sheet, then compare line items, not just the bottom line, to spot which one is padding setup time.
Sheet-metal Specific Estimation Workflow
Sheet-metal prototypes follow a workflow that is more mechanical, and therefore more predictable, than most other processes once you know what inputs to prepare.
Start by estimating material from the flat-pattern area and nesting efficiency on the raw sheet, since yield loss around each part directly raises the effective material cost, following the approach described in product development cost guidance. Add cutting or punching setup and runtime, then bending setup and runtime, since each unique bend typically adds its own setup step on a press brake. Welding or hardware insertion, finishing, inspection, packaging, and freight round out the per-unit cost.
Several drivers are easy to miss on a first pass. Raw-sheet yield and nesting efficiency can swing material cost by a meaningful margin depending on how well parts pack onto a standard sheet size. Bend count matters because each bend adds setup time even when the part itself is small. The choice between stamping and brake forming depends on volume: stamping dies pay for themselves only once volume justifies the tooling cost, according to research on sheet-metal stamping cost models. Finish choice, whether powder coat, anodize, or plating, is priced separately and should be specified up front rather than assumed.
To get an accurate quote, suppliers need a flat-pattern DXF or STEP file, complete tolerances, a finish specification, target batch size, and the intended production process. HLH Sheet Metal’s own guidance on sheet-metal prototyping workflows covers this file preparation in more depth for readers building their first RFQ package.
- Calculate material from flat-pattern area and nesting yield, not sheet size alone.
- Add separate setup and runtime lines for cutting, bending, and welding.
- Specify finish, tolerance, and batch size before requesting a quote.
- Ask whether the process quoted is brake forming or stamping, since the cost curve differs sharply by volume.
Checklist And Simple Template: Fields To Include In Your Prototype Cost Sheet
A usable cost sheet starts with the right inputs and maps cleanly to the three buckets described earlier.
- Collect geometry files (STEP, DXF), a complete BOM, tolerances, finish specification, target volume, and schedule before requesting quotes.
- Create line items for Bucket 1 (material, per-part processing, assembly labor), Bucket 2 (tooling, fixtures, programming), and Bucket 3 (any new equipment your team needs).
- Note the landed BOM multiplier and contingency percentage you applied so stakeholders can see your assumptions.
Watch for quotes that bundle setup and material into a single number, since that makes it impossible to compare suppliers fairly. A checklist for DFM preparation can help you confirm you have every file a supplier needs before you send an RFQ.
- Geometry files, BOM, tolerances, finish, volume, and schedule.
- Separate line items for each of the three buckets.
- A stated multiplier and contingency percentage.
Author Perspective: Budgeting Instincts For Founders And Product Teams
The founders who run into trouble are rarely the ones who guessed wrong on a unit price. They are the ones who never budgeted for tooling, testing, or the internal lab equipment their team needed anyway. A realistic contingency, built and shown rather than buried, tells an investor you understand where the risk actually sits in a hardware build.
The harder call is speed versus fidelity versus cost, and there is no universal right answer. An in-house 3D printer wins on iteration speed for early form checks. Outsourced CNC or sheet-metal work wins once you need real tolerances and a finish that survives handling. Some sheet metal fabrication suppliers support that shift by handling fast prototype runs and scaling the same design into a pilot batch without forcing a new vendor relationship at each stage.
— Nash
How HLH Sheet Metal Can Help With Fast Sheet-metal Prototyping
Once your estimate points toward a metal enclosure, bracket, or chassis, the next step is turning that number into a real quote. Certain specialized sheet metal fabricators handle laser cutting, bending, welding, and surface finishing under one roof, along with quick NRE support so a first-round prototype does not stall waiting on tooling decisions.
To get an accurate quote, send a flat-pattern DXF or STEP file, your tolerance and finish requirements, target quantity, and your schedule. Our sheet metal fabrication capabilities page outlines the services available for both a single prototype and a pilot production run.
- Laser cutting and bending for fast, low-volume iterations.
- Welding and assembly for complete enclosures and brackets.
- Surface finishing options quoted alongside the base part.
- Quick NRE support so tooling decisions do not delay your first build.
Sources
Once you have a working estimate, a handful of references can help you sanity-check the numbers against independent research and industry guides.
- How much does product development cost — design, prototype, and manufacturing (Trimech)
- Reference-based cost estimation workflow (MDPI, 2020)
- Rapid prototyping cost: pricing guide & cost factors (JLC, 2026)
- Prototype costing for hardware startups: three-bucket budgeting (Glencoyne, 2025)
FAQ
What Are The Five Levels Of Cost Estimation?
Cost estimation commonly progresses from order-of-magnitude estimates, through preliminary and budget estimates, to definitive and control estimates as a project matures. Definitions vary by industry, but the pattern generally moves from a rough directional number early on to a detailed, quote-backed figure closer to production.
What Is The 0.6 Rule For Cost Estimating?
The scaling rule with an exponent near 0.6 is used in some industries to estimate costs of larger equipment from smaller ones. It is more common in process and chemical engineering than in prototype fabrication, where the three-bucket method described above is more directly applicable.
How Much Does A Prototype Cost?
Costs vary widely by type: appearance models typically run $150 to $2,000, functional mechanical prototypes span $1,500 to $60,000, and metal prototypes made with CNC or laser cutting run $500 to $10,000 or more. The exact price depends on material, geometry, quantity, and how finished your design is before you request a quote.
How Do I Do A Cost Estimate For A Project?
Start with the three-bucket method: estimate per-unit cost from your BOM and processing, add one-time tooling or NRE, and account for any internal infrastructure your team needs, as outlined in hardware startup budgeting guidance.
What Does HLH Sheet Metal Need To Give Me An Accurate Prototype Quote?
HLH Sheet Metal typically needs a flat-pattern DXF or STEP file, complete tolerances, a finish specification, your target batch size, and your schedule to return an accurate quote. Sending reference parts or prior quotes alongside these files usually speeds up the turnaround.

